We are going to create a simple but very impressive "2D Rain" effect in Unity using a Particle System. 🙂
Unity Tutorial Level: Beginner.
1.1 Creating a New Project.
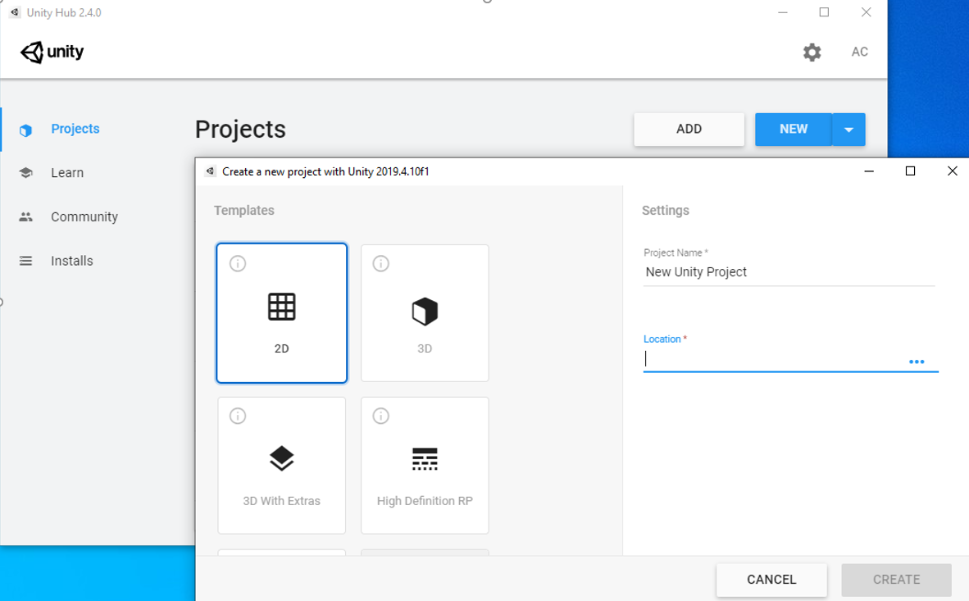
We are going to create a new project in Unity:
- Open Unity Hub in your PC.
- On the home screen, click on the “New” button .
- In the “Project name” field, type the name that you like the most for your project, we recommend “2D_VFX”.
- In the “Location” field, select where you want your project to be saved.
- Select the “2D” box.
- Click on “Create".
1.2 Setting the environment.
As a highly recommended activity, we are going to create some folders that allow us to better manage all the files (know as "assets") we are going to use to create our visual effects (creating folders so that in them we can place the different types of assets that we will use is a regular practice when working in Unity). So, let's start!! 😀
Once our new project is created, we will look inside it for the "Project" tab , and within it we right click on the "Assets" folder, this will display a menu of options from which we will choose "Create" and then "Folder". This will create a new folder inside "Assets" which will we name it "Sprites".
Repeat the previous steps to create another folder inside "Assets" but this time with the name of "Materials".
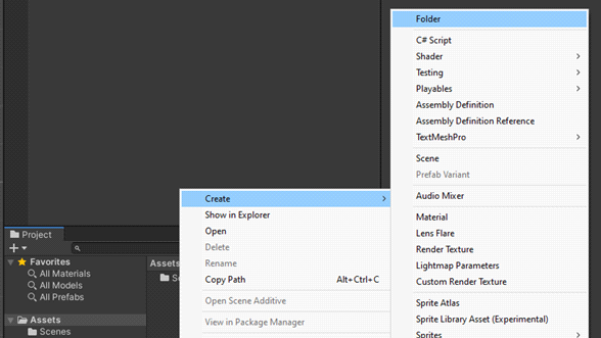
In the "Sprites" folder, we are going to place the image files that we will take as a basis to create our visual effects and, in the "Materials" folder, we will place the "Mat" (o "Material") type files that Unity uses to define the general characteristics that the images will have in our visual effects.


1.3 Uploading the "Sprite".
To finalize the preparations we are going to load the image or "sprite" that we will use as the basis for our "2D Rain".
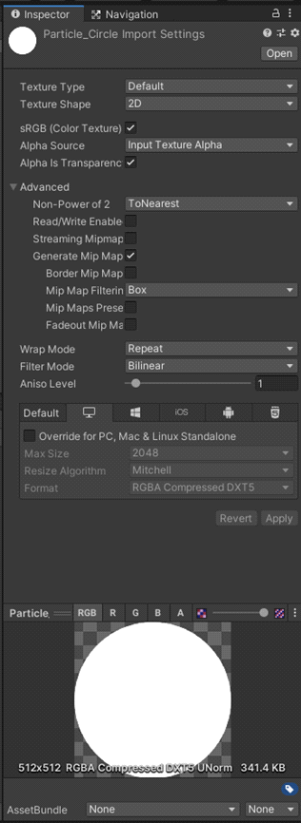
For this, the image that we will use will be this "White Circle" which will later be modified to create the desired rain effect. You can download this image and use it, just right click on it and select "Save image as ..."

White circle with transparent background in "PNG" format, with a size of "500 x 500 px".
Once you have downloaded this image or have created one of the same characteristics in your preferred design software, "drag and drop" this file inside the "Sprites" folder that you just created in Unity. Select the file and modify its properties as shown below (do not forget to press "Apply" when finished so that the changes can be saved).


2 Creating the material.
With our "sprite" ready in Unity, it's time to create the "material" file that will be used to generate our visual effect. As mentioned before, these "mat" or "materials" type files are used by Unity to define the base characteristics that the images that conform our special effect will have.
Let's start by locating the folder "Material" that we made in the previous steps, then right click on it and select "Create" and finally, click on "Material".
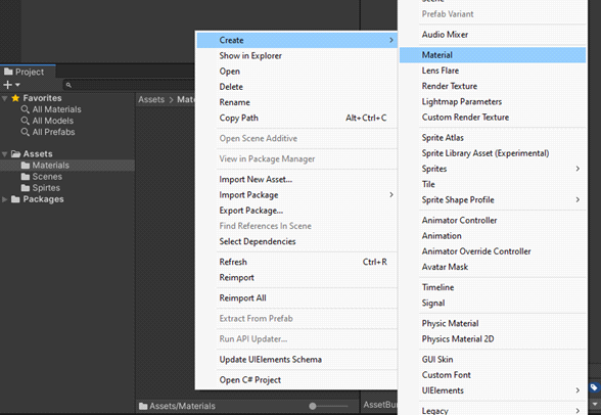
The file that has just been generated we will name it as "ParticleMat_Circle", then we select it and assign it the following properties:
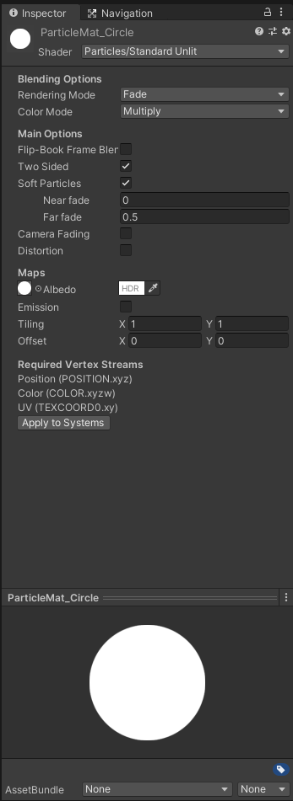
These properties define the type of "Shader" to be used (a "shader" is an algorithm used to generate images with certain characteristics). Without deepen into the subject, we can say that we will use an algorithm or "shader" to generate images used in particle systems (particle systems are responsible for generating a large number of simple and small images that we can use as special effects. , for example, in explosions, flares, fog and so on).
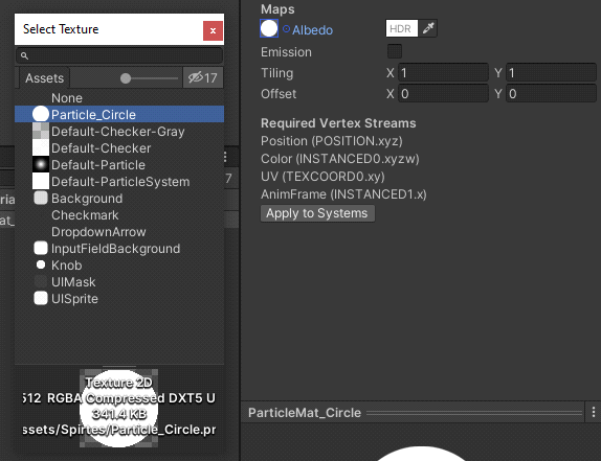
As our 2D Rain Effect is based on a particle system that uses small circles to create the effect of drops that disperse into the environment, we need to define in our material the image that will be used to create the small drops. To do this, in the properties of our material, in the "Maps" section we click on the small circle next to the word "Albedo",when doing this, a window will appear from where we can select our white circle "Sprite".
Once this is done, we click on "Apply to Systems" and we will have our material ready to generate the rain effect.
3 Setting the Particle System.
It's time to set the particle system that will bring our 2D Rain effect to life. 😀
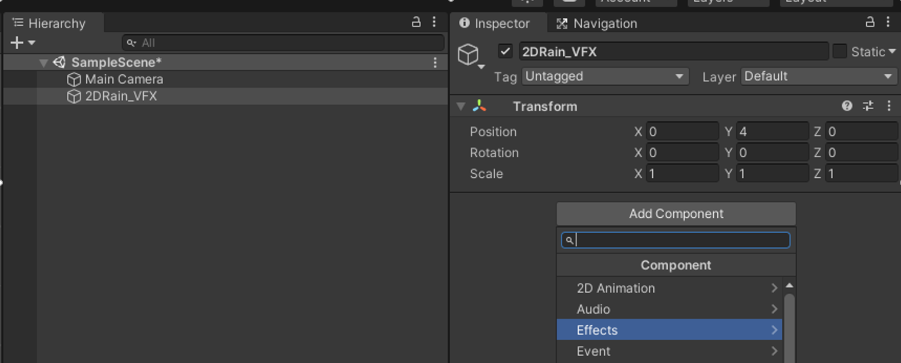
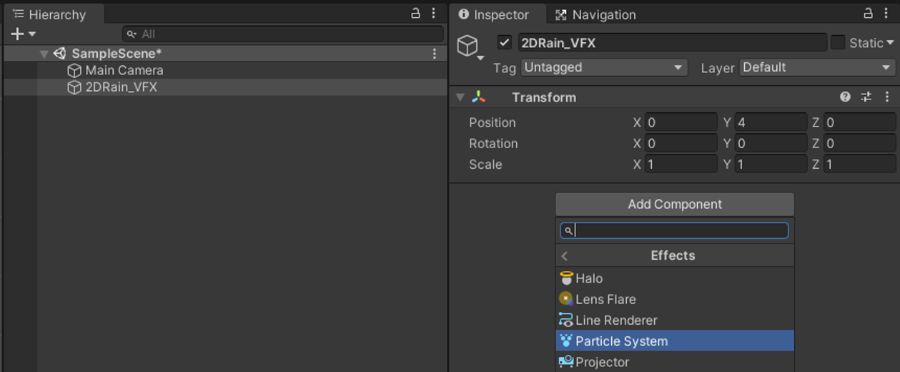
Let's start by creating a game object in Unity, for this, it is necessary to locate the "Hierarchy" tab and inside it, find somewhere empty and right click and choose "Create Empty", this will create an empty game object that we will rename as "2DRain_VFX".

Our game object "2DRain_VFX" although is empty it has the "Transform" properties which are in charge of defining the position, orientation and scale of this object within the scene of our project. To have better control over our object, it is necessary to select it and adjust the values within "Transform" in order to "Position" be equal to zero in "X, and Z" and equal to four in "Y", "Rotation" be equal to zero in "X, Y y Z" and "Scale" be equal to one in "X, Y y Z".
Then, to add the particle system to our object, it is necessary to select it and press the button "Add Component" that appears below "Transform" and from the list select "Effects" and then "Particle System". With this we will have a particle system ready to use.
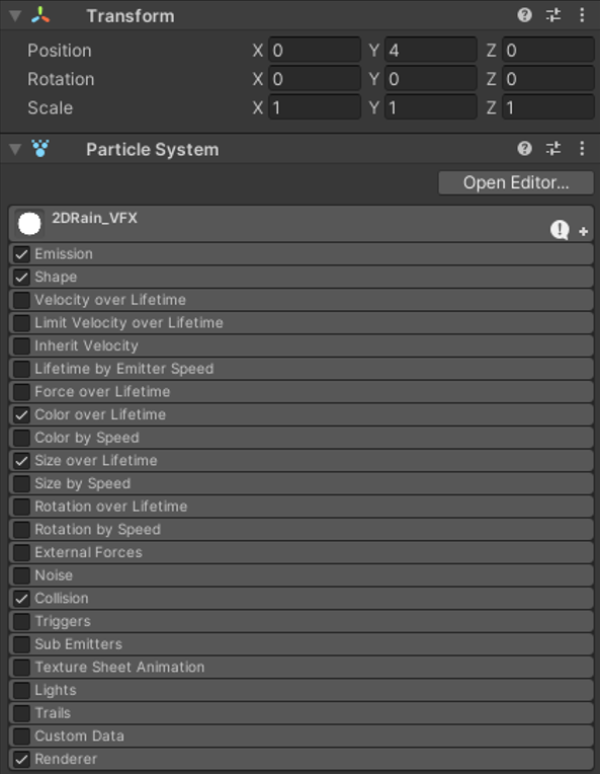
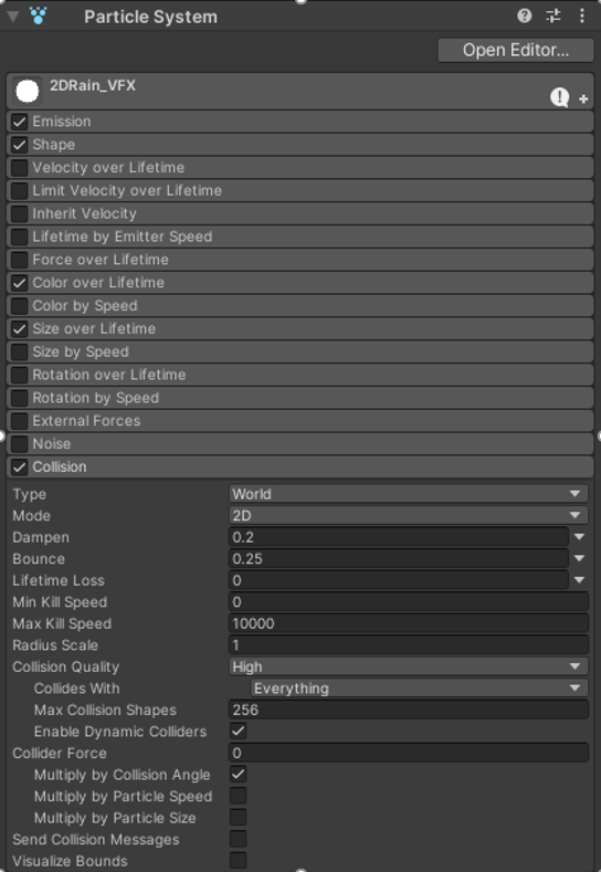
Our particle system is created, but before configuring it to create our rain effect, it is necessary to have selected within it only the following boxes: "Emission", "Shape", "Color over Lifetime", "Size over Lifetime", "Collision" y "Renderer".
4 Creating the "2D Rain".
It's time to configure our particle system to create the 2D Rain effect we want..
Initially, when creating the particle system, Unity will show us in the scene of our project some magenta squares that seem to come out of nowhere; this is the particle system in action, but since it does not have a "Material" assigned to display, Unity generates these magenta boxes to announce that there is no material or that something is wrong with it. To change it, let's do the following:
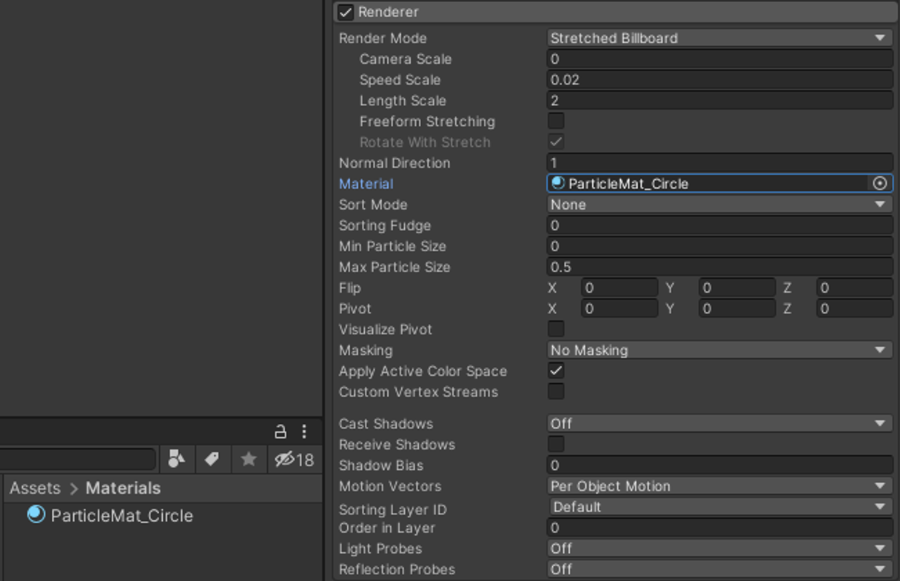
First, select our game object "2DRain_VFX", then in its particle system we click on "Renderer" so that its options are displayed and we look for the one with the name "Material" (which at this moment must be empty). Now what we need to do is drag our material file "ParticleMat_Circle" and drop it on the box in front of "Material" so that it is assigned as the image to be displayed in the particle system (replacing the magenta squares with white circles).
Once this is done we click on"Renderer" to collapse it; we will return to it later 🙂
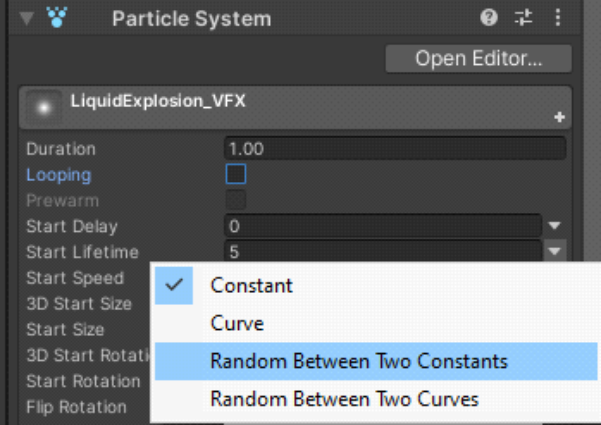
Now, within the particle system we click on the text "2DRain_VFX" (this text has the same name as our game object) and with this, the general options to configure the system will be displayed. These options must be modified as follows:
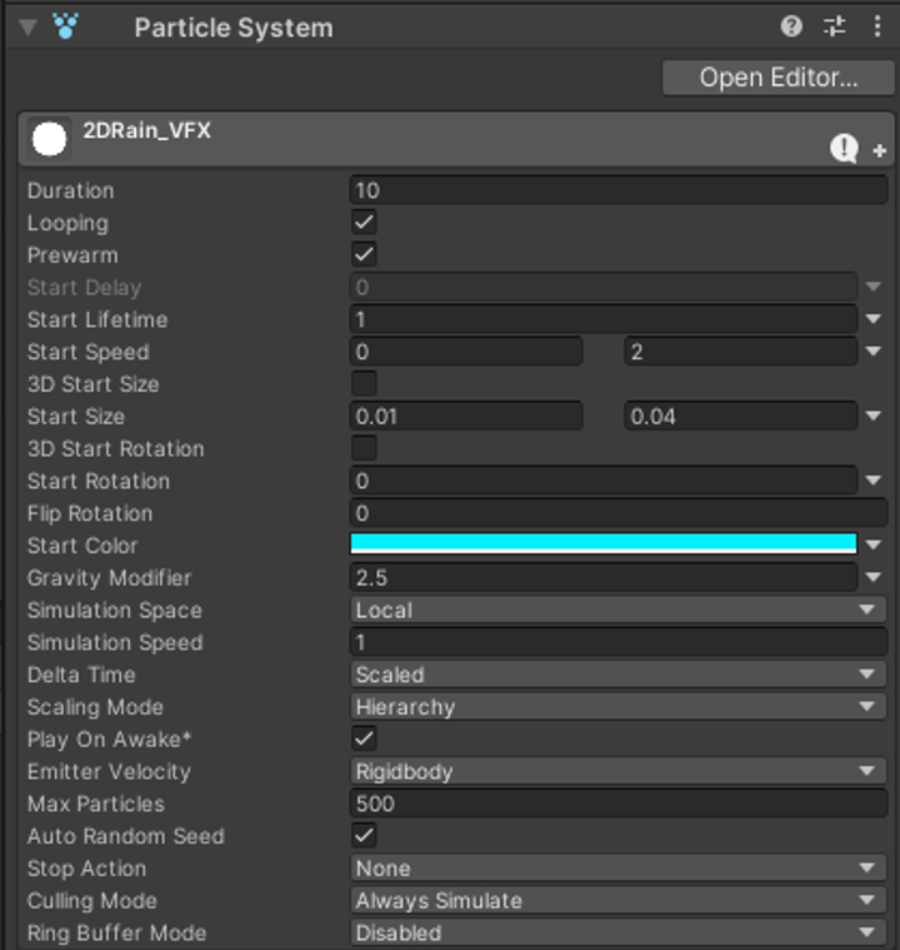
In order to "Start Speed" show two boxes instead of just one, you must click on the small arrow next to the box and choose "Random Between Two Constants".
The color can be chosen by clicking on the box in front of "Start Color".
The values shown here are those necessary to create a rain effect as shown in the example video in this tutorial, but you can create your own 2D Rain Effects by modifying any of the properties of the particle systems.
Notes for the exercises.
Once this tutorial is finished, we recommend you to create new rain effects but this time modifying the following parameters:
Duration: To modify the duration time of the entire effect.
Looping: To make the effect repeat itself once.
Start Lifetime: To modify the duration time of each particle.
Start Speed: To change the speed at which the particles are fired.
Start Size: To modify the initial size with which the particles will be created.
Start Color: To modify the color of the particles.
Gravity modifier: To change how fast the particles will fall.
Max Particles: To modify the amount of particles that can be generated during the rain.
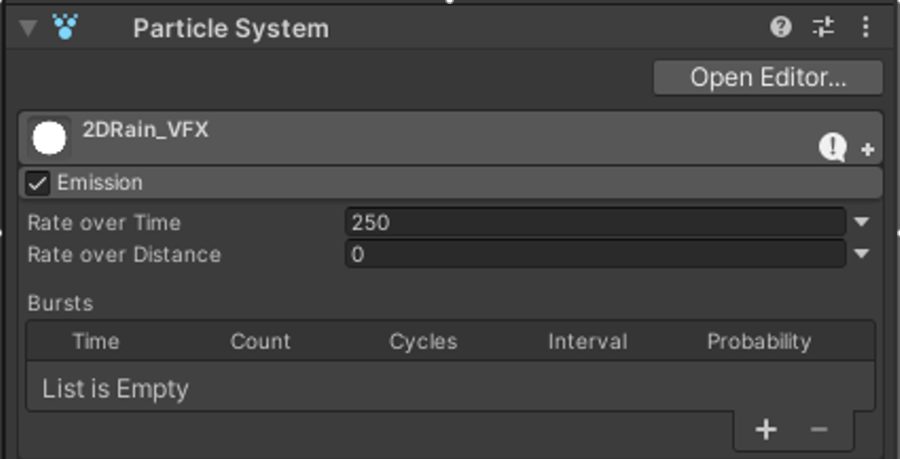
Now let's go to the "Emission" section , here we will define the exact amount of particles that we want it to be generated during the life of our rain effect (in this case we are only going to generate 250 particles).
Notes for the exercises.
Once this tutorial is finished, we recommend you to create new rain effects but this time modifying the following parameters:
Rate over Time: To modify the amount of particles to be generated (the value of "Rate over Time" must be less than the value assigned to "Max Particles" in previous step).
In the "Shape" section, we will adjust the way we want our particles to be projected, in this case we want them to be projected randomly along an horizontal line and then they start to fall.

Notes for the exercises.
Once this tutorial is finished, we recommend you to create new rain effects but this time modifying the following parameters:
Radius: To modify the length of the horizontal line from which the particles are generated.
Mode: To modify the pattern in which the particles are shot.
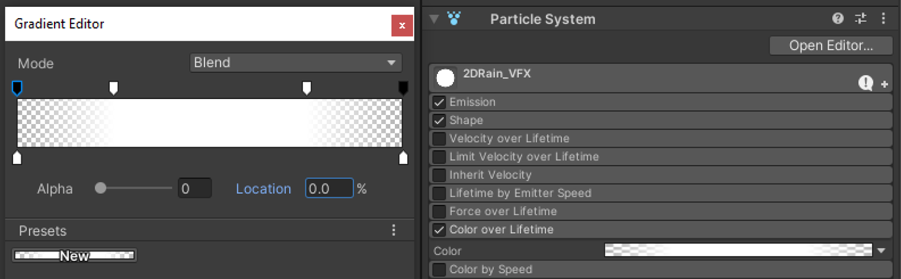
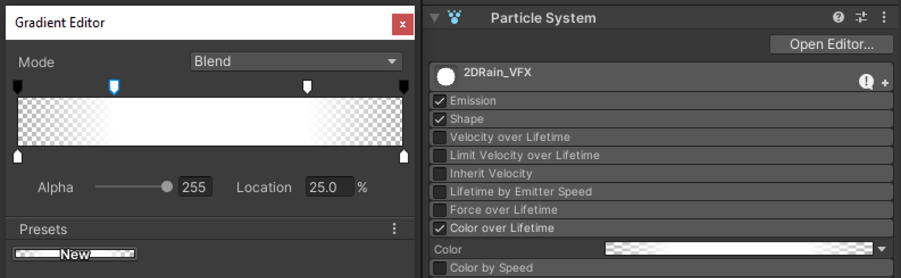
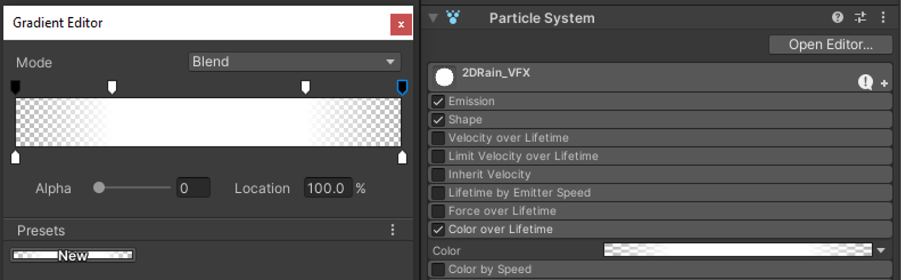
In the "Color over Lifetime" section, we will make our particles become transparent when they reach the end of their life time (giving the effect that they disappear progressively). For this, we will modify the "Color" box by clicking on it and entering to the "Gradient Editor".

Notes for the exercises.
Once this tutorial is finished, we recommend you to create new rain effects but this time modifying the following parameters:
The flags at the top of the rectangle modify the percentage of transparency that all particles will have (you can create more by clicking in this area).
The flags at the bottom of the rectangle modify the color that all the particles will have (you can create more by clicking in this area).
The position of the flags on the horizontal axis determines when, with respect to the total life span of the particle the required color and transparency characteristic will be applied.
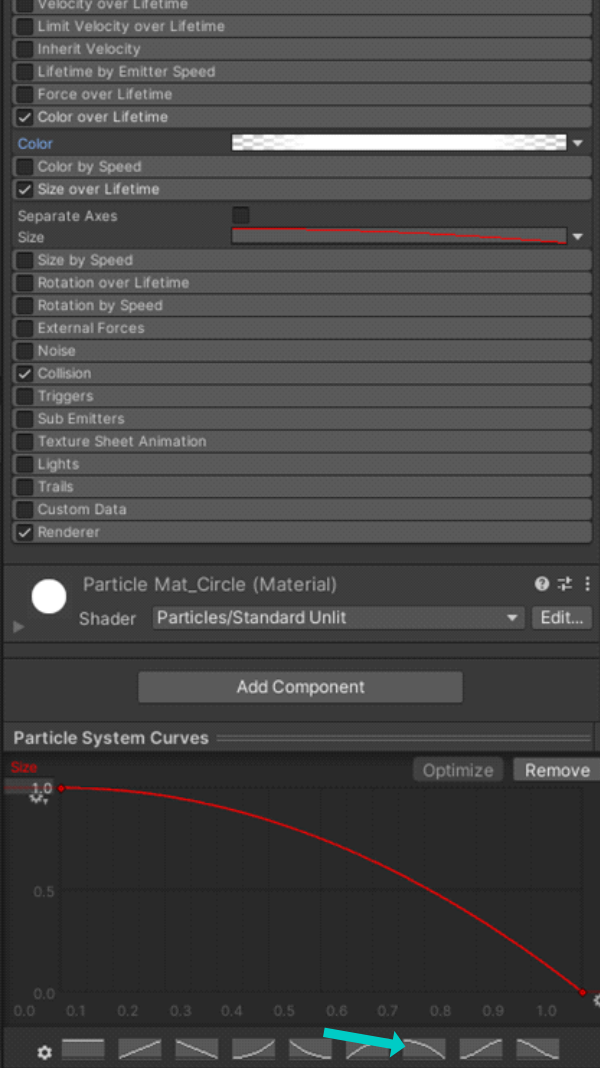
In the "Size over Lifetime" section, we are going to modify the behavior of the size that our particles will have during the rain effect, in such a way that they start at normal size (the sizes defined previously in "Start Sizes") and then they start to reduce.
El comportamiento del tamaño lo vamos a definir usando una gráfica a la cual podemos acceder al hacer clic en la casilla de "Size", al hacerlo, en la parte inferior de la pestaña "Inspector" se mostrará la gráfica con título "Particle System Curves", está gráfica la vamos a modificar haciendo clic sobre una de las curvas ya predefinidas en Unity (seleccionamos la curva que señala la flecha).
We are going to define the behavior of the size using a graph which we can access by clicking on the "Size" box, by doing so, at the bottom of the "Inspector" tab the graph with title of "Particle System Curves" will be displayed , now, we are going to modify this graph by selecting one of the predefined curves that Unity presents by default (choose the one pointed by the arrow in the below image).
Notes for the exercises.
Once this tutorial is finished, we recommend you to create new rain effects but this time modifying the following parameters:
Modify the curve so that you get different behaviors in the particles sizes.
The "Collision" section allows us to make our particles to interact with other objects in the game through collisions; we will use this section to be able to make our particles bounce off the floors and walls that surround them.
Notes for the exercises.
Once this tutorial is finished, we recommend you to create new rain effects but this time modifying the following parameters:
Bounce: To modify the force with which particles bounce when they collide with an object (the object must have a "Collider 2D").
The last section to modify is "Renderer", and this defines the characteristics that our particles will have when they are shown on the screen.
Notes for the exercises.
Once this tutorial is finished, we recommend you to create new rain effects but this time modifying the following parameters:
Speed Scale: To modify the length of our particle in relation to its speed (thus it allows us to have an elongated shape at the moment of starting the rain).
Length Scale: To modify the length of our particle in relation to its width (this allows us to maintain a slightly elongated shape at the end of the rain).
Order in Layer: If we have more "Sprites" in our scene and we want our rain effect to be shown in front of or behind them, we modify this value.
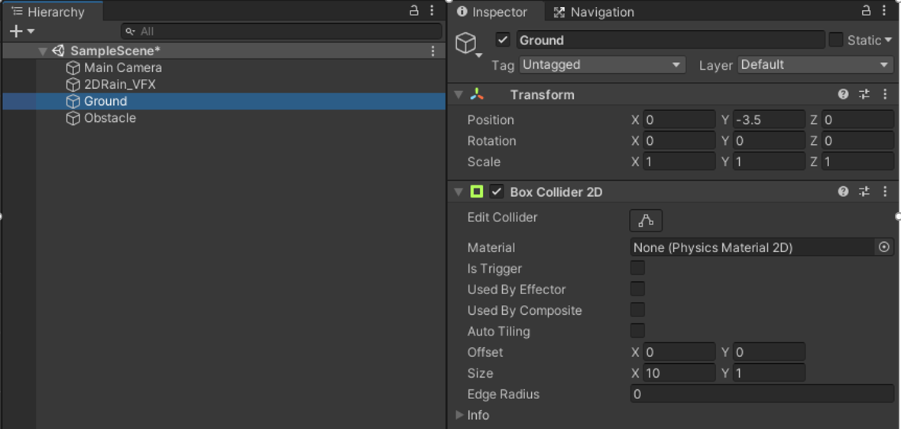
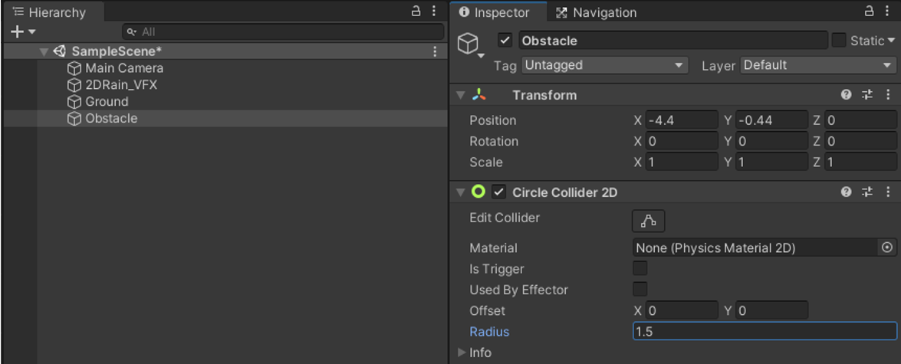
Finally to check that our particles bounce off an object in the game that contains a "Collider 2D", we're going to create two new empty game objects and we will name them "Ground" and "Obstacle" (these will be the floor and an additional object with which our particles will bounce off). We assign them a "Box Collider 2D", a "Circle Collider 2D" respectively and we make sure our objects have the following characteristics:
We test our effect by pressing the "Play" button and ¡¡our "2D Rain Effect" is now complete and ready to be used 😀 !!